This is a step-by-step guide on how to make a perfect all butter pie crust dough. Homemade pie crust is super easy to make once you get the hang of it, you just need a little practice!
When it comes to pie, the crust is just as important as the filling amirite? This all butter pie crust is easy to work with, perfectly buttery, flaky, and delicious!
I love to make this in bulk and store it ahead so that I have frozen pie dough ready to go whenever I need it.


INGREDIENTS NEEDED
Flour – This pie crust dough recipe uses all-purpose flour.
Butter – You’ll need unsalted butter for this recipe. This is the star ingredient and it makes the pie crust flaky and layered. Cut the butter into chunks, and makes sure to use cold unsalted butter straight from the fridge, in order to avoid it melting.
Sugar – Granulated sugar or caster sugar. I like my pie crust a bit sweet. If you want a sugar free pie crust, you are welcome to leave this out.
Salt – Enhances the flavor.
Water – Liquid brings the dough together, but make sure the water is super cold to help the butter from melting while you’re working your dough.
STEP-BY-STEP INSTRUCTIONS
(Be sure to check the recipe card below for the full ingredients list & instructions)
To make the pie dough by hand:
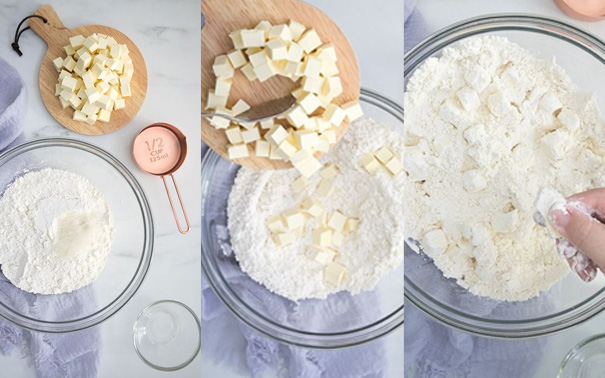
- In a large bowl, combine all-purpose flour, sugar, and salt, then whisk until well combined.
- Add the butter cubes, and gently toss the butter cubes through the flour mixture until each piece is well coated.
- Using a pastry cutter or your fingers, cut the butter into the flour mixture until it resembles a coarse meal (pea-sized chunks with a few larger chunks of butter). Keep tossing the butter through the flour mixture as you work.
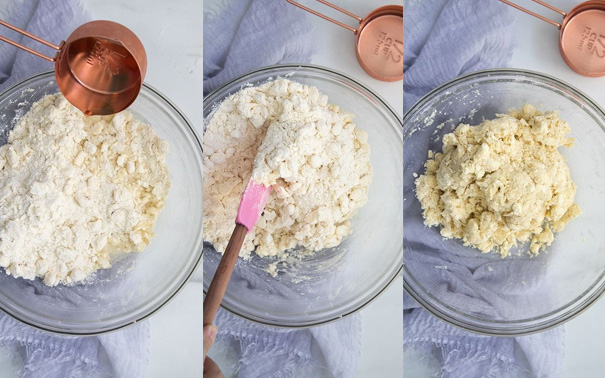
- Sprinkle 6 tablespoons of the ice-cold water into the flour and butter mixture, then mix in well using a stiff spatula or your hand. Continue adding the cold water 1 tablespoon at a time until the dough comes together.
I usually use 120g (1/2 cup) ice cold water, but if the dough doesn’t come together, you can add an extra 1-3 tablespoons of cold water. Make sure the dough is not too wet. It should hold together easily in a ball form, but not sticky. - Transfer the dough to a lightly floured work surface, then knead it a few times to make sure it’s fully incorporated.
Form it into a ball, then gently flatten the dough into 1-inch thick discs. Wrap tightly in plastic wrap and rest in the fridge for one hour.
Laminate the pie crust dough:
(you can skip this step, but I highly recommend laminating your pie dough. It gives the dough extra layer and flaky after it bakes)
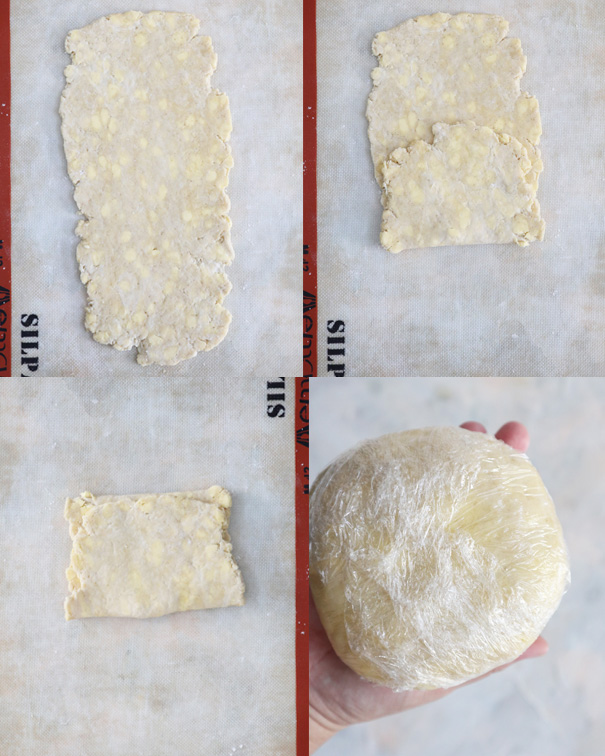
- Roll out the chilled dough on a lightly floured surface into a large rectangle, then fold the dough in thirds like folding a letter, then roll it again to a large rectangle. Repeat this process one more time.
- Divide the dough into 2 even pieces, then shape each of them into a 3/4-inch thick disc. Wrap tightly in plastic wrap, and rest in the fridge for at least 2 hours or up to 3 days.
- You can also keep it in the freezer for up to 3 months.
TIPS FOR THE BEST PIE CRUST
- Mix all the dry ingredients together in a large bowl, then place the bowl in the refrigerator while you get the rest of the ingredients ready.
- Use cold butter straight from the fridge.
- Make sure the water is cold too.
- Keep the dough cold in every step, to prevent melty butter.
- Laminate the dough to get extra flaky layers.
HOW TO STORE
Wrap the dough with plastic wrap at least 2 layers, then store it in the fridge for up to 3 days.
You can also freeze it for up to 3 months, just make sure to wrap it well with layers of plastic wrap. When you’re ready to use the dough, remove from the freezer and place it into the fridge overnight, then continue the process in the exact same way you would use a fresh pie crust from the fridge.
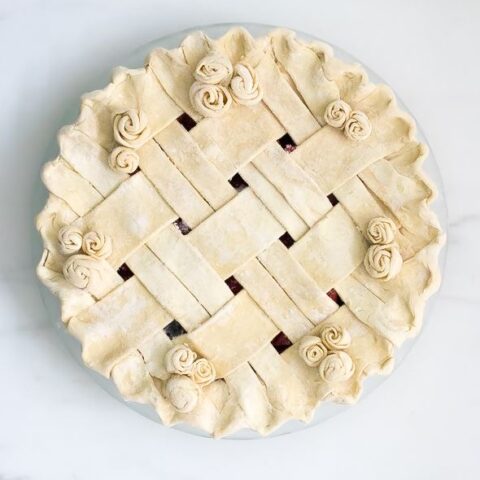
All Butter Pie Crust
This is a step-by-step guide on how to make a perfect all butter pie crust dough. Homemade pie crust is super easy to make once you get the hang of it, you just need a little practice!
Ingredients
- 375g (3 cups) all-purpose flour
- 50g (1/4 cup) caster sugar
- 1+1/2 teaspoons salt
- 282 (2 + 1/2 sticks) cold unsalted butter, cubed
- 180g (3/4 cup) ice cold water
Instructions
To make the pie crust dough by hand:
In a large bowl, combine all-purpose flour, sugar, and salt, then whisk until well combined. Add the butter cubes, gently toss the butter cubes through the flour mixture until each piece is well coated.
Using a pastry cutter or your fingers, cut the butter into the flour mixture until it resembles a coarse meal (pea-sized chunks with a few larger chunks of butter). Keep tossing the butter through the flour mixture as you work.
Sprinkle 6 tablespoons of the ice-cold water into the flour and butter mixture, then mix in well using a stiff spatula or your hand. Continue adding the cold water 1 tablespoon at a time until the dough comes together. I usually use 120g (1/2 cup) ice cold water, but if the dough doesn't come together, you can add an extra 1-3 tablespoons of cold water. Make sure the dough is not too wet. It should hold together easily in a ball form, but not sticky.
Transfer the dough to a lightly floured work surface, then knead it a few times to make sure it’s fully incorporated.
Form it into a ball, then gently flatten the dough into a 1-inch thick disc. Wrap tightly in plastic wrap and rest in the fridge for one hour.
Laminate the pie crust dough:
(you can skip this step, but I highly recommend laminating your pie dough. It gives the dough en extra flaky layers after it bakes.
Gently smack the dough with the rolling pin so it loosens up, then roll out the chilled dough on a lightly floured surface into a large rectangle, then fold the dough in thirds like folding a letter, then roll it again to a large rectangle. Repeat this process one more time.
Divide the dough into 2 even pieces, then shape each of it into a 3/4-inch thick disc. Wrap tightly in plastic wrap, and rest in the fridge for at least 2 hours or up to 3 days.
You can also keep it in the freezer for up to 3 months.
♥ ♥ ♥
If you try this recipe, I’d love to hear what you think! Send me a message or write a comment below.
Also be sure to snap a picture and tag me on your social media posts with #thejobaker
Happy Baking!



Leave a Reply