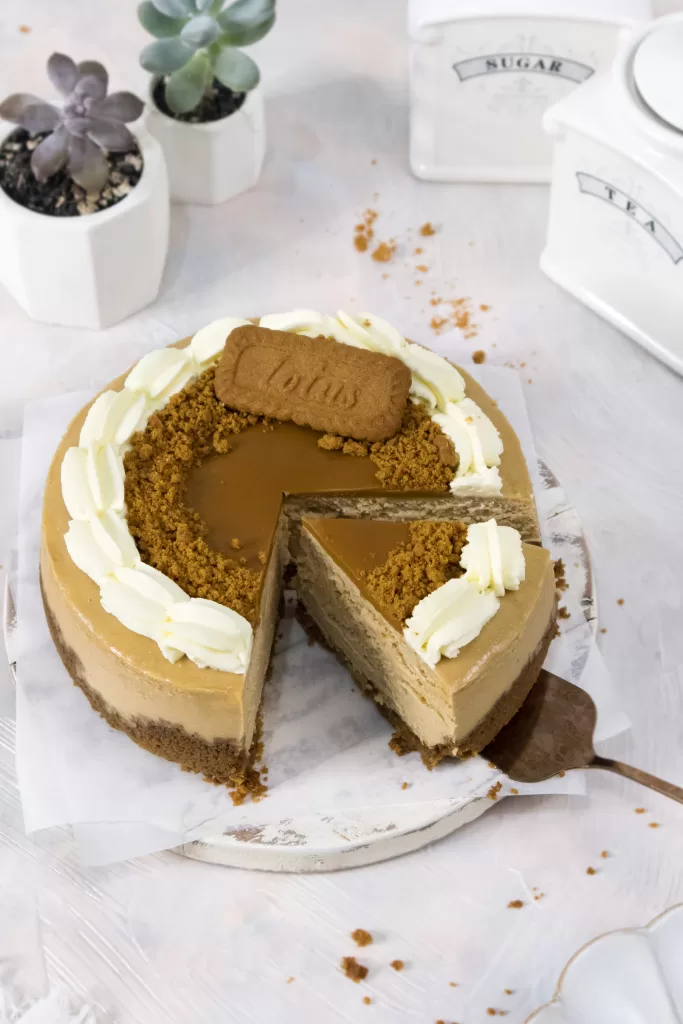
This biscoff cheesecake is the perfect dessert for cookie butter lovers! Every bite is pure indulgence, so creamy, luscious, and packed with cookie butter flavor. It truly is cookie butter heaven!
We all know that creamy, melt-in-your-mouth version of those iconic speculoos biscoff cookies, right? Sweet, buttery, and spiced with warm hints of cinnamon and caramel. Oh so good!
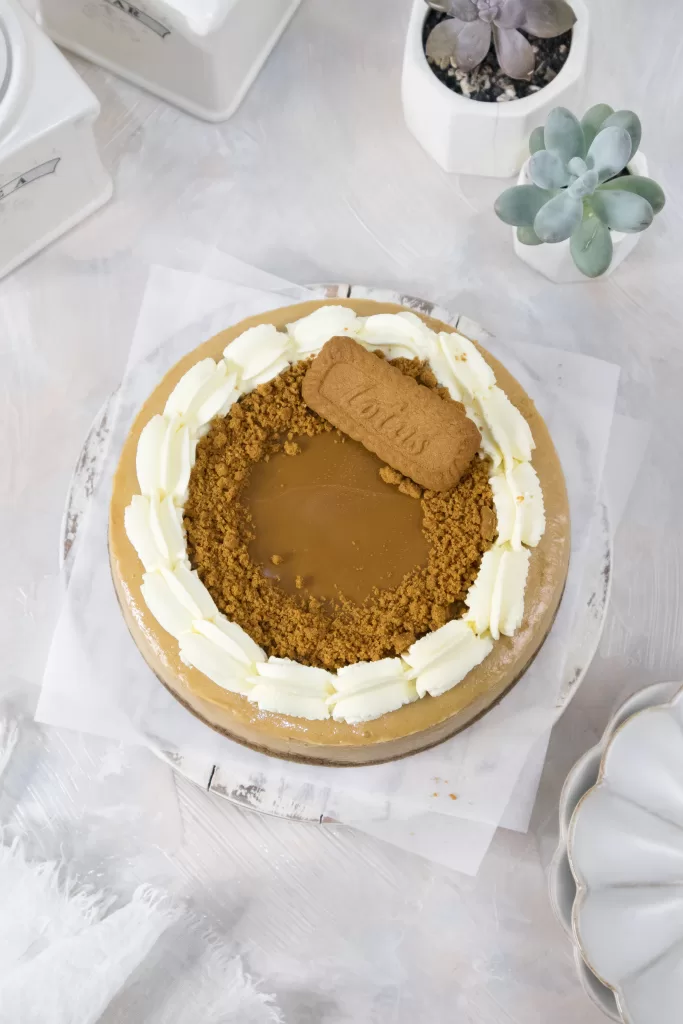
This cheesecake is made with the yummy biscoff cookie butter and also the biscoff cookies. Lotus biscoff cookies are used to make the crust, the cookie butter is folded into the cheesecake batter, then finished with a layer of melted cookie butter and biscoff cookie pieces for crunch.
The texture is smooth and creamy, but dense and rich at the same time. It’s a cookie butter cheesecake dream! So, if you love biscoff and are needing a deliciously decant dessert, this cheesecake is absolutely for you!
FAQ (Frequently Asked Questions) >
WHY YOU’LL LOVE THIS BISCOFF CHEESECAKE
- Creamy, luscious, and packed with cookie butter flavor.
- Every bite is pure indulgence!
- It is the perfect dessert for cookie butter lovers!
- This cheesecake is so easy to make, you just need a lil bit patience to prepare the pan!
INGREDIENTS NEEDED & NOTES
Biscoff Cookie Butter Spread – You can find this biscoff cookie butter spread at most local grocery stores, make sure you grab the creamy smooth one, not the crunchy spread. You can also use Trader Joes cookie butter spread, that will also work great.
Biscoff Cookies – Use biscoff biscuits (cookies) or any similar off brand version that you enjoy.
Cream Cheese – This cheesecake is made with Original Brick Cream Cheese, which is full-fat, not the cream cheese spread. It’s so important to use full-fat cream cheese, not reduced-fat, for this baked cheesecake. Bring this to room temperature.
Heavy Cream – You’ll need this to make the cheesecake filling and also to make whipped cream. You can use room-temperature heavy cream to make the cheesecake filling, but remember to use cold heavy cream to make the whipped cream.
Eggs – The cheesecake would fall apart without eggs. Eggs hold the cheesecake together and the extra yolks help to enhance that super creamy texture. Use large eggs, and make sure the eggs are at room temperature.
Vanilla Extract – A good quality vanilla extract is needed to provide a lovely background flavor.
Sugar – This recipe uses 3 types of sugar. Powdered sugar, granulated sugar and light brown sugar. You can use light brown sugar or dark brown sugar, both work!
Salt – This will do the job of balancing out the flavor.
BAKING TOOLS & EQUIPMENT YOU’LL NEED
(Check my favorite baking tools and equipment here!)
- 8-inch springform pan
- Electric mixer
- Mixing bowls
- Food Processor
- Rubber spatula
- Parchment Paper
- Heavy duty aluminum foil
- Baking Spray
STEP-BY-STEP INSTRUCTIONS TO MAKE THIS BISCOFF CHEESECAKE
(Be sure to check the printable recipe card below)
Cheesecake Crust:
160g (about 20) lotus biscoff cookies
56g (1/2 stick) unsalted butter
Cheesecake Filling:
566g (20oz) original cream cheese
110g (1/2 cup) light brown sugar
66g (1/3 cup) granulated sugar
120g (1/2 cup) heavy cream
180g (3/4 cup) lotus biscoff spread
2 teaspoons vanilla extract
3 large egg
1 egg yolk
1/4 teaspoon salt
Topping:
60g (1/4 cup) lotus biscoff spread
4 lotus biscoff cookies
240g (1 cup) heavy cream, cold
2 tablespoons powdered sugar
STEP 1 – Prepare the Springform Pan, Ingredients, and Pre-heat the Oven
Line the bottom and sides of an 8-inch springform pan with parchment paper, then wrap the outside of the spring-form pan with two layers of heavy-duty aluminum foil. You must do this step because you’ll be placing the cheesecake in a water bath, so be sure you wrap the pan perfectly, then set aside.
Make sure your ingredients are at room temperature, especially the cream cheese and eggs, then boil some water for the water bath and preheat the oven to 350°F.
STEP 2 – Make the Biscoff Crust
Using a food processor, pulse the biscoff cookies into fine crumbs. Transfer the cookie crumbs to a medium bowl, add in the melted butter, then mix well with a rubber spatula until well combined.
Transfer the crust mixture to the prepared springform pan. Firmly press it down into the bottom of the pan. You can use the bottom of a drinking glass or measuring cup to pack it in.
Bake for 10 minutes at 350°F. Remove from the oven and allow to cool while you make the filling. Don’t turn the oven off.
STEP 3 – Make the Biscoff Cheesecake Filling
Using a hand mixer or a stand mixer fitted with a paddle attachment, beat the room temperature cream cheese, granulated sugar, and brown sugar for about 3 minutes on medium speed until well combined. Then, add in heavy cream, biscoff spread, salt, and vanilla extract. Mix until it’s completely smooth and creamy. Scrape down the sides and bottom of the bowl.
With the mixer on low speed, add in the eggs one at a time, beating well after each addition. Remove the bowl from the mixer, then scrape down the sides and bottom of the bowl. Do not overwork the batter, so you don’t deflate the air in it.
STEP 4 – Bake the Biscoff Cheesecake
Pour the cheesecake batter into the slightly cooled crust, then smooth the top with a small rubber spatula.
Place the cheesecake in a large baking dish that is bigger than your cheesecake’s pan (I use a 9×13 baking dish). Place the cheesecake on the middle rack of the oven, then fill the large pan with boiling water about 1.2 inches up the sides of the cheesecake pan.
Bake the cheesecake for about 50 minutes at 350°F or until the cheesecake is lightly browned on top, but the center is slightly jiggly. The cheesecake will puff up a little in the oven but will come back down when it’s cooling.
Once it’s done, turn off the oven, let the oven’s door open about an inch, and leave the cheesecake in the oven to cool down slowly. Let it sit in there for about an hour.
Remove the cheesecake from the oven, remove the foil, and let it cool completely to room temperature. After the cheesecake is completely cool, cover and refrigerate for at least 4 hours (best to leave it chill overnight).
STEP 5 – Make the Topping and Enjoy!
Using an electric mixer, combine 1 cup of cold heavy cream and 2 tablespoons of powdered sugar, whip until stiff peak. Then, in a small heat-proof bowl, microwave 1/4 cup biscoff spread until melted. Set aside.
Carefully remove the cheesecake from the rim, then transfer the cheesecake to your serving plate.
By using a medium star piping tip, pipe the whipped heavy cream around the cheesecake, so it’s like a wreath. Then, pour the melted biscoff spread in the centre, and decorate with biscoff cookie pieces. Enjoy!
TIPS FOR MAKING THE BEST BISCOFF CHEESECAKE
- Go for full-fat cream cheese! This will ensure that the cheesecake turns out as intended, is creamy, and tastes amazing!
- Make sure your ingredients are at room temperature, especially the cream cheese and eggs! Softened cream cheese blends more smoothly, preventing lumps in your filling.
- Pre-Bake the Crust! Baking the crust before adding the filling ensures it stays crisp and doesn’t get soggy.
- Mix the cheesecake batter only until combined to avoid incorporating too much air, which can cause cracks.
- Bake the cheesecake in a water bath. Water baths help the cheesecakes bake gently and evenly. Also, the steam from the hot water creates a nice humid environment for baking and it prevents the cheesecake from drying out and cracking.
- Wrap your cheesecake pan with aluminum foil, at least 2 layers to avoid water from the water bath seeping into the crevices of the springform pan.
- After baking, turn off the oven, let the oven’s door open about an inch, and let it cool slowly in the oven to prevent the cheesecake from cracking.
- Make sure to chill the cheesecake cake for at least 4 hours (best to leave it chill overnight) to make sure this creamy cheesecake is properly set.
- Use a springform pan so you can easily remove the creamy cheesecake from the pan.
HERE’S HOW TO SERVE AND STORE THE LEFTOVER BISCOFF CHEESECAKE
To serve the cheesecake – This cheesecake makes about 8 to 10 slices. You can enjoy it cold straight from the fridge or at room temperature.
To store the cheesecake – You’ll need to keep it in the refrigerator in an airtight container to maintain its texture and flavor and to prevent bacteria growth. If you are keeping it at room temperature, ensure to eat it within 3 hours.
To Freeze the cheesecake – If you want to freeze this cheesecake for later, I recommend cutting it into individual slices. Wrap each slice with layers of plastic wrap to prevent it from drying out, and place it in a freezer-safe container. It will last in the freezer for up to 3 months.

Biscoff Cheesecake
This biscoff cheesecake is the perfect dessert for cookie butter lovers! Every bite is pure indulgence, so creamy, luscious, and packed with cookie butter flavor. it truly is cookie butter heaven!
Ingredients
Crust:
- 160g (about 20) lotus biscoff cookies
- 56g (1/2 stick) unsalted butter
Cheesecake Filling:
- 566g (20oz) original cream cheese
- 110g (1/2 cup) light brown sugar
- 66g (1/3 cup) granulated sugar
- 120g (1/2 cup) heavy cream
- 180g (3/4 cup) lotus biscoff spread
- 2 teaspoons vanilla extract
- 3 large egg
- 1 egg yolk
- 1/4 teaspoon salt
Topping:
- 60g (1/4 cup) lotus biscoff spread
- 4 lotus biscoff cookies
- 240g (1 cup) heavy cream, cold
- 2 tablespoons powdered sugar
Instructions
STEP 1 – Prepare the Springform Pan, Ingredients, and Pre-heat the Oven
Line the bottom and sides of an 8-inch springform pan with parchment paper, then wrap the outside of the spring-form pan with two layers of heavy-duty aluminum foil. You must do this step because you’ll be placing the cheesecake in a water bath, so be sure you wrap the pan perfectly, then set aside.
Make sure your ingredients are at room temperature, especially the cream cheese and eggs, then boil some water for the water bath and preheat the oven to 350°F.
STEP 2 – Make the Biscoff Crust
Using a food processor, pulse the biscoff cookies into fine crumbs. Transfer the cookie crumbs to a medium bowl, add in the melted butter, then mix well with a rubber spatula until well combined.
Transfer the crust mixture to the prepared springform pan. Firmly press it down into the bottom of the pan. You can use the bottom of a drinking glass or measuring cup to pack it in.
Bake for 10 minutes at 350°F. Remove from the oven and allow to cool while you make the filling. Don’t turn the oven off.
STEP 3 – Make the Biscoff Cheesecake Filling
Using a hand mixer or a stand mixer fitted with a paddle attachment, beat the room temperature cream cheese, granulated sugar, and brown sugar for about 3 minutes on medium speed until well combined. Then, add in heavy cream, biscoff spread, salt, and vanilla extract. Mix until it’s completely smooth and creamy. Scrape down the sides and bottom of the bowl.
With the mixer on low speed, add in the eggs one at a time, beating well after each addition. Remove the bowl from the mixer, then scrape down the sides and bottom of the bowl. Do not overwork the batter, so you don’t deflate the air in it.
STEP 4 – Bake the Chocolate Hazelnut Cheesecake
Pour the cheesecake batter into the slightly cooled crust, then smooth the top with a small rubber spatula.
Place the cheesecake in a large baking dish that is bigger than your cheesecake’s pan (I use a 9×13 baking dish). Place the cheesecake on the middle rack of the oven, then fill the large pan with boiling water about 1.2 inches up the sides of the cheesecake pan.
Bake the cheesecake for about 50 minutes at 350°F or until the cheesecake is lightly browned on top, but the center is slightly jiggly. The cheesecake will puff up a little in the oven but will come back down when it’s cooling.
Once it’s done, turn off the oven, let the oven’s door open about an inch, and leave the cheesecake in the oven to cool down slowly. Let it sit in there for about an hour.
Remove the cheesecake from the oven, remove the foil, and let it cool completely to room temperature. After the cheesecake is completely cool, cover and refrigerate for at least 4 hours (best to leave it chill overnight).
STEP 5 – Make the Topping and Enjoy!
Using an electric mixer, combine 1 cup of cold heavy cream and 2 tablespoons of powdered sugar, whip until stiff peak. Then, in a small heat-proof bowl, microwave 1/4 cup biscoff spread until melted. Set aside.
Carefully remove the cheesecake from the rim, then transfer the cheesecake to your serving plate.
By using a medium star piping tip, pipe the whipped heavy cream around the cheesecake, so it's like a wreath. Then, pour the melted biscoff spread in the centre, then decorate with biscoff cookie pieces. Enjoy!
♡♡♡
If you try this recipe, I’d love to hear what you think! Send me a message or write a comment below.
Also, be sure to snap a picture and tag me on your social media posts with #thejobaker
Happy Baking!


Leave a Reply