Crazy delicious, fudgy, and chewy in every bite! This Skillet Brookie makes the ultimate dessert for brownie and cookie lovers! Definitely will satisfy your sweet tooth.
This recipe was originally published on July 2, 2022
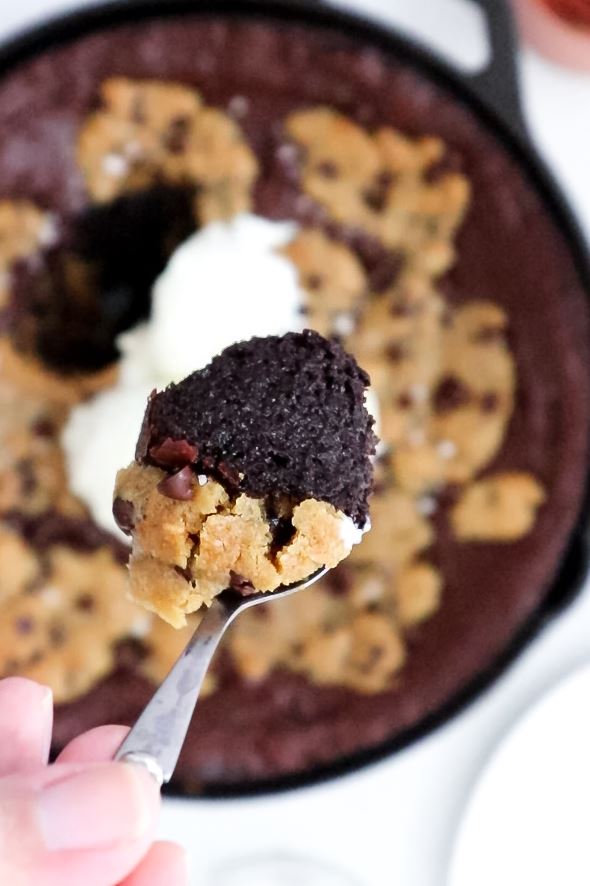
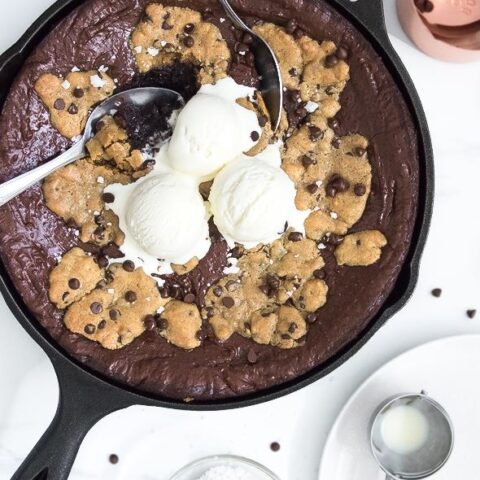
If you aren’t yet familiar with BROOKIE… Let me introduce you to the best dessert combo ever! This dessert is a combination of chocolate brownie and chocolate chip cookie. They’re swirled together to form a crazy delicious sweet treat in a skillet. It’s chewy, fudgy, and gooey in the center. You don’t have to choose between brownies or cookies anymore, just make this skillet brookie. It’s the very best of both worlds! You’re going to LOVE this!

WHY YOU’LL LOVE THIS SKILLET BROOKIE
- Brownie and cookie combo! Best of both worlds.
- It’s chewy, fudgy, and gooey in the center
- Baked in a skillet. Perfect for sharing!
- Kids and adults will love this brookie.
- Perfect to enjoy with ice cream.
INGREDIENTS NEEDED & NOTES
Butter – Always use unsalted butter for baking, so you can control the amount of salt in your baked goods. If you prefer salted butter or it’s all you have, that’s totally ok! but don’t forget to reduce half of the salt, or skip the salt.
Sugar – Grab granulated sugar and brown sugar to make this Skillet Brookie. The combination of these two sugars adds both sweetness and moisture to the brookie. you can only use light brown sugar if that’s what you have on hand, it will work just as well.
Eggs – Never forget to set your eggs out of the fridge in advance. You need room-temperature eggs so they combine nicely with the batter and make the best result.
Flour – You only need regular all-purpose. Nothing fancy here.
Salt – This will do the job of balancing out the sweetness.
Vanilla Extract – This enhances and balances the flavor of chocolate.
Cocoa Powder – I love Dutch process cocoa powder. Regular unsweetened cocoa powder works too.
Chocolate – You need 65%-72% dark chocolate for this recipe. High-quality cocoa powder and dark chocolate are totally worthy for this brookie.
BAKING TOOLS & EQUIPMENT YOU’LL NEED
(Check my favorite baking tools and equipment here!)
- Electric mixer
- Mixing bowls
- Small saucepan
- 10.25-inch cast iron skillet or any oven-safe skillet
- rubber spatula

STEP-BY-STEP INSTRUCTIONS TO MAKE THIS SKILLET BROOKIE
(Be sure to check the recipe card below for the full ingredients list & instructions)
STEP 1 – Preheat the Oven and Prepare the Skillet
Preheat oven to 350F and lightly grease a 10.25″ cast iron pan with butter. Set aside.
STEP 2 – Make the Cookie Dough
In a medium bowl, combine and whisk together all-purpose flour, baking powder, and salt. Set aside.
In a large mixing bowl or the bowl of a stand mixer fitted with paddle attachment, cream together room-temperature butter, brown sugar, and granulated sugar on medium speed until light and creamy for about 3 minutes. Reduce the mixer speed to medium-low, then add in vanilla extract and the egg one at a time, beating well after each addition. Mix everything until well combined.
Add in the flour mixture and continue to mix on medium-low speed only until just combined. Do not over-mix the cookie dough. A few streaks of flour remaining are okay. Remove the bowl from the mixer and use a rubber spatula to fold in the chocolate chips until well combined. Set aside.
STEP 3 – Make the Brownie Batter
Fill a medium saucepan with water about an inch, simmer over medium-low heat. Place the dark chocolate and butter in a large heatproof bowl, then set the bowl over the simmering water, and let it melt completely.
Meanwhile, in the bowl of a stand mixer or a large bowl, combine eggs, granulated sugar, brown sugar, and vanilla extract, and set aside. Then, in a separate bowl, sift together the all-purpose flour, cocoa powder, and salt, and set aside.
Remove the chocolate and butter mixture, stir it until well combined, and let it cool slightly for about 4 minutes.
Immediately whisk the egg mixture for 4 minutes on medium speed until the mixture is pale and airy. Reduce the mixer speed to low speed, then pour in the slightly cooled chocolate-butter mixture, and mix until fully combined.
With the mixer still running on low speed, add in all the dry ingredients, and mix just until everything is well combined.
STEP 4 – Assemble and Bake
Scoop two tablespoon-sized portions of cookie dough into the prepared skillet, then scoop the brownie batter into the alternate spots in between the cookie dough. Continue until all of the cookie dough and brownie batter are used. Press down the top cookie dough balls so that they are the same height as the brownie batter.
Bake at 350F for about 25 minutes or until the edges are set and the center of the brookie is slightly underbaked. For a firmer brookie, you can bake it for about 35 minutes. If the cookie dough begins to brown too quickly, place a piece of aluminum foil loosely across the top.
Let the skillet brookie cool on a cooling rack for about 1 hour before serving. For sharp edges and even slices, chill the brookie for one hour before slicing with a sharp knife.
TIPS FOR MAKING THE BEST SKILLET BROOKIE
- Beat the eggs and sugar well for 4 minutes, to bring more air into the batter. This will form that perfectly crackled and shiny top.
- Don’t over-mix the batter. When adding in the dry ingredients, only mix or fold the mixture until no more flour is visible.
- Slightly underbake the brookie! The key to a fudgy and gooey texture is slightly underbaking it! Remember the brownies will continue to cook as they cool so it’s okay if they’re a little gooey in the middle when you take them out!
- When measuring the flour, make sure to spoon and level the flour into your measuring cup. Do not scoop and pack the flour. By doing this, you will yield too much flour and make the batter dry. 1 cup flour = 125 grams.
- Use a kitchen scale. Baking with a kitchen scale is so much more accurate than cup measurements.
HERE’S HOW TO SERVE AND STORE THE LEFTOVERS
I highly recommend enjoying this skillet brookie fresh from the oven, or at least on the same day you bake them. It has the best texture and flavor on the day that they are baked.
If you have leftovers or you want to keep these brownies for later, cover them tightly with plastic wrap and store it in the fridge for up to 5 days.
You can also freeze these brownies! I recommend cutting it into individual slices. Wrap each piece with layers of plastic wrap to prevent it from drying out, and place it in a freezer-safe container. It will last in the freezer for up to 3 months.

Skillet Brookie
Crazy delicious, chocolatey, fudgy, and chewy in every bite! This Skillet Brookie recipe makes the ultimate dessert for chocolate lovers and definitely will satisfy your sweet tooth.
Ingredients
Cookie Dough
- 170g (1 + 1/2 sticks) unsalted butter
- 110g (1/2 cup) light brown sugar
- 50g (1/4 cup) granulated sugar
- 1 large egg
- 2 teaspoons vanilla extract
- 219g (1 + 3/4 cups, spoon and level method) all-purpose flour
- 1/2 teaspoon baking powder
- 1/2 teaspoon salt
- 130g (3/4 cup) mini chocolate chips
Brownie Batter
- 113g (1 stick) unsalted butter
- 200g (7oz) dark chocolate, 70% cacao
- 110g (1/2 cup) light brown sugar
- 100g (1/2 cup) granulated sugar
- 2 large eggs
- 1 teaspoon vanilla extract
- 94g (3/4 cup, spoon and level method) all-purpose flour
- 2 tablespoons dutch process cocoa powder
- 1/2 teaspoon salt
Instructions
STEP 1 - Preheat the Oven and Prepare the Skillet
Preheat oven to 350F and lightly grease a 10.25" cast iron pan with butter. Set aside.
STEP 2 - Make the Cookie Dough
In a medium bowl, combine and whisk together all-purpose flour, baking powder, and salt. Set aside.
In a large mixing bowl or the bowl of a stand mixer fitted with paddle attachment, cream together room-temperature butter, brown sugar, and granulated sugar on medium speed until light and creamy for about 3 minutes. Reduce the mixer speed to medium-low, then add in vanilla extract and the egg one at a time, beating well after each addition. Mix everything until well combined.
Add in the flour mixture and continue to mix on medium-low speed only until just combined. Do not over-mix the cookie dough. A few streaks of flour remaining are okay. Remove the bowl from the mixer and use a rubber spatula to fold in the chocolate chips until well combined. Set aside.
STEP 3 - Make the Brownie Batter
Fill a medium saucepan with water about an inch, simmer over medium-low heat. Place the dark chocolate and butter in a large heatproof bowl, then set the bowl over the simmering water, and let it melt completely.
Meanwhile, in the bowl of a stand mixer or a large bowl, combine eggs, granulated sugar, brown sugar, and vanilla extract, and set aside. Then, in a separate bowl, sift together the all-purpose flour, cocoa powder, and salt, and set aside.
Remove the chocolate and butter mixture, stir it until well combined, and let it cool slightly for about 4 minutes.
Immediately whisk the egg mixture for 4 minutes on medium speed until the mixture is pale and airy. Reduce the mixer speed to low speed, then pour in the slightly cooled chocolate-butter mixture, and mix until fully combined.
With the mixer still running on low speed, add in all the dry ingredients, and mix together just until everything is well combined.
STEP 4 - Assemble and Bake
Scoop two tablespoon-sized portions of cookie dough into the prepared skillet, then scoop the brownie batter into the alternate spots in between the cookie dough. Continue until all of the cookie dough and brownie batter are used. Press down the top cookie dough balls so that they are the same height as the brownie batter.
Bake at 350F for about 25 minutes or until the edges are set and the center of the brookie is slightly underbaked. For a firmer brookie, you can bake it for about 35 minutes. If the cookie dough begins to brown too quickly, place a piece of aluminum foil loosely across the top.
Let the skillet brookie cool on a cooling rack for about 1 hour before serving. For sharp edges and even slices, chill the brookie for one hour before slicing with a sharp knife.
♡♡♡
If you try this recipe, I’d love to hear what you think! Send me a message or write a comment below.
Also, be sure to snap a picture and tag me on your social media posts with #thejobaker
Happy Baking!


Leave a Reply