
Easy homemade lemon curd comes together easily on the stove in less than 15 minutes! It’s super creamy, delicious, perfectly sweet, and tangy.
If you’re a fan of lemon-flavored desserts like I do, this recipe is a must make for you. Put a little dollop of this lemon curd on your favorite baked goods, like scones, crepes, or pound cake is next level!
INGREDIENTS NEEDED
Fresh lemons – I highly suggest using fresh lemons. You’ll need the fresh lemon juice and also the zest.
Sugar – You need this to balance out the acidity.
Eggs – Provides the majority of the structure so the curd sets properly. This recipe uses 10 eggs in total, 2 whole eggs, and 8 egg yolks. For me, some egg whites make the texture perfect, not too thick. But if you prefer a thicker texture, you can use 14 yolks instead.
Butter – Makes the curd smooth and glossy, and also creates an extra layer of richness.
Salt – to enhance and balances the flavor.

EQUIPMENT YOU’LL NEED
- Saucepan
- Heat-proof bowl
- Whisk
- Rubber spatula
- Jar container or a bowl
- Plastic wrap
STEP-BY-STEP INSTRUCTIONS
(Be sure to check the recipe card below for the full ingredients list & instructions)
- Fill a medium saucepan with water about 2 inches, then simmer over medium heat.
- In a heat-proof glass bowl, combine all the ingredients except the unsalted butter. Whisk the mixture until completely blended, then place the bowl over the simmering water and continue to whisk until the mixture becomes thick and soft. If the curd isn’t thickening, turn up the heat and constantly whisk.
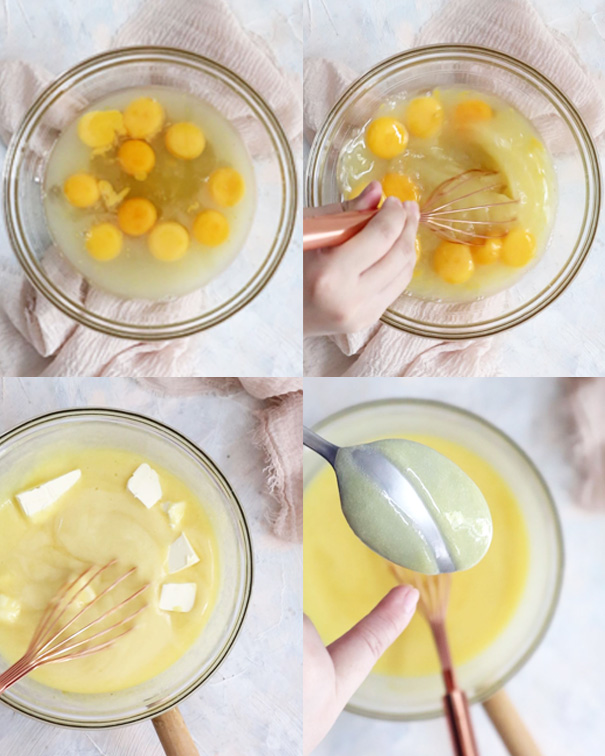
- Remove the bowl from heat, then whisk the sliced butter into the hot curd mixture. Keep whisking until well combined.
- Immediately pour the lemon curd into a glass jar or a bowl, then place a piece of plastic wrap directly on top of the surface. Refrigerate until it cools completely, then cover it tightly and keep refrigerated for up to a week.

TIPS FOR MAKING THE BEST LEMON CURD
Make sure the lemons are fresh and clean
Cook the lemon curd by using a double boiler – Cooking curd over direct heat quickly leads to burning, so I highly recommend using a double boiler. If you can make a simple double boiler by placing a heatproof glass bowl on top of a saucepan with simmering water, just make sure the bottom of the bowl doesn’t come into contact with the simmering water. The whole point of a double boiler is that you are using indirect heat to cook the food.
Avoid metal bowls – If you cook lemon curd in a metal double boiler, it may have a metallic aftertaste, so it’s better to use a glass bowl.
Whisk constantly – to prevent the mixture from curdling while cooking.
HOW TO STORE LEMON CURD
- Once the lemon curd is done cooking, immediately pour the curd into a glass jar or container.
- Place a piece of plastic wrap directly on top of the surface to prevent a skin from forming on top.
- Refrigerate until it cools completely, then cover it tightly and keep refrigerated for up to a week.


Lemon Curd
Easy homemade lemon curd comes together easily on the stove in less than 15 minutes! It’s super creamy, delicious, perfectly sweet, and tangy.
Ingredients
- 240g (1 cup) fresh lemon juice
- zest of 1 - 2 lemon
- 200g (1 cup) granulated sugar
- 2 large eggs
- 8 large egg yolks
- 1/4 teaspoon salt
- 141g (1 + 1/4 sticks) unsalted butter, sliced
Instructions
Fill a medium saucepan with water about 2 inches, then simmer over medium heat.
In a heat-proof glass bowl, combine all the ingredients except the unsalted butter. Whisk the mixture until completely blended, then place the bowl over the simmering water and continue to whisk until the mixture becomes thick and soft. If the curd isn’t thickening, turn up the heat and constantly whisk.
Remove the bowl from heat, then whisk the sliced butter into the hot curd mixture. Keep whisking until well combined.
Immediately pour the lemon curd into a glass jar or a bowl, then place a piece of plastic wrap directly on top of the surface. Refrigerate until it cools completely, then cover it tightly and keep refrigerated for up to a week.
♡♡♡
If you try this recipe, I’d love to hear what you think! Send me a message or write a comment below.
Also be sure to snap a picture and tag me on your social media posts with #thejobaker
Happy Baking!
Leave a Reply