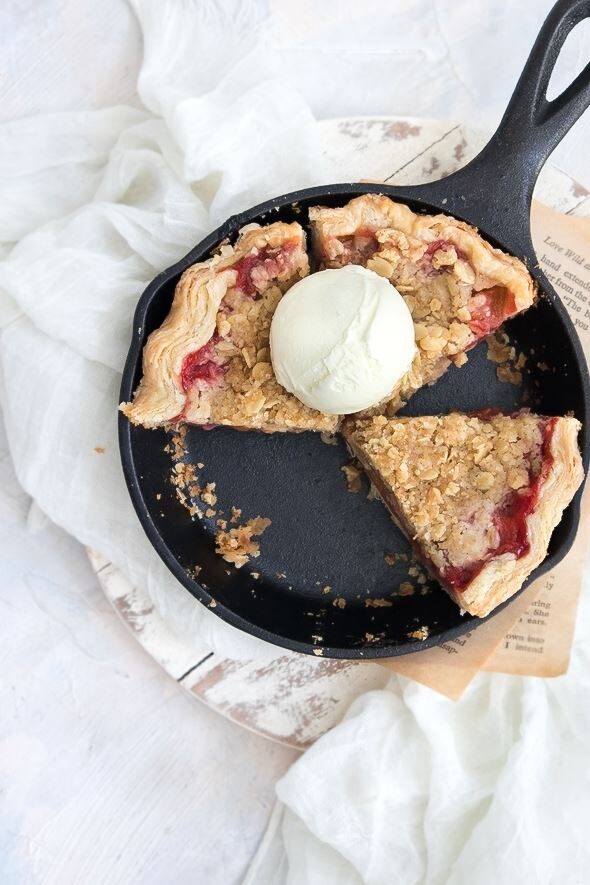
These adorably cute and delicious cherry hand pies are made with sweet cherry pie filling and buttery flaky pie crust with a sprinkle of sugar on top! You can enjoy these pies at any time of day, breakfast, afternoon snack, or after-dinner dessert.
Summer is almost over, so I soak up the last sweet summer cherries and make these cute Cherry Hand Pies! These hand pies are so perfect in the summer when cherries are sweet and fresh, but this recipe is great with frozen cherries too. So, you still can make these Cherry Hand Pies when cherries are not in season, they taste just as good! You’ll want to make these Cherry Hand Pies all season long!
WHY YOU’LL LOVE THESE CHERRY HAND PIES
- Easier to make than you might think!
- Bursting with sweet summer flavor.
- Made with flaky buttery pie crust.
- They’re hand-held, fit in the palm of your hand, and no plate or sharing required.
- You can make these hand pies all year long. If fresh cherries are not in season, this recipe is great with frozen cherries too.
- You can swap the sweet cherries for your favorite cherry, sour cherries are great too!
- You can freeze the unbaked pie for up to 3 months, just make sure you cover the pie tightly with plastic wrap.
INGREDIENTS NEEDED & NOTES
Pie Crust – This recipe uses my go-to all-butter flaky pie crust. You’ll need to prepare the pie crust dough first because the dough will need to have some time to chill before baking. Chilling the dough ensures that the pie crust won’t shrink and the butter doesn’t just melt out of the crust when baking. If you don’t have time to make the homemade pie crust, feel free to use your favorite store-bought pie crust.
Cherries – You’ll need sweet cherries for this recipe. Fresh or frozen cherries work, but I highly recommend fresh if you can, fresh cherries are always the best option. Also, feel free to use any other types of cherry you like.
Lemon – It gives extra flavor and it complements the cherries.
Sugar – This recipe uses granulated sugar to enhance the flavor. Feel free to adjust the sugar to suit your taste.
Cornstarch – You’ll need this to thicken the filling, so you’ll not end up with a soggy crust.
TOOLS YOU’LL NEED
- Medium saucepan
- Rubber spatula
- Rolling pin
- Mixing bowl
- 4-Inch round cookie cutter
STEP-BY-STEP INSTRUCTIONS
(Be sure to check the recipe card below for the full ingredients list & instructions)
STEP 1 – Make the Pie Dough
Here is the recipe and instruction for my homemade all-butter flaky pie crust. I suggest making the dough ahead of time because the dough will need to have some time to chill in the fridge. If you want to use store-bought pie crust, it’s totally ok!
STEP 2 – Make the Pie Filling
Make sure to clean the cherries, then hull and cut the cherries in half. If you’re using frozen cherries, no need to clean and thaw it.
In a medium pot, combine the cherries and all the remaining ingredients then bring to a boil over medium heat. Stir constantly for about 2 minutes, then reduce the heat and simmer for about 8 minutes until the cherries are thick and jammy. Remove from heat and allow it to cool completely.
STEP 3 – Assemble and Bake
Divide the pie dough into 2 equal parts. On a lightly floured work surface, roll the first piece of pie dough into a large rectangle, making sure it’s not too thick, about 1/6 inch thick.
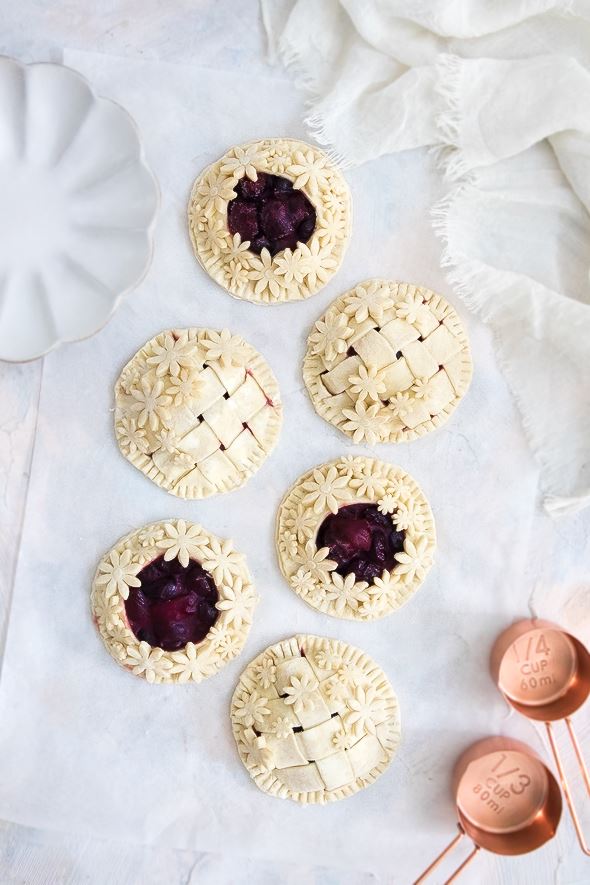
Use a 4-inch cookie cutter to cut the dough into circles. Pile the dough scraps on top of one another, then roll it out again and make more circles. You should make at least 6 circles from the first piece of pie dough. These circles are for the base layer of your hand pies. Place the circle on a baking tray lined with parchment paper and place it in the fridge while you make the top layer.
Then, roll the second piece of pie dough into a large rectangle, about 1/6 inch thick to make the top layer, and cut it into stripes to make lattice top or you can simply cut it into circles again. If the dough is too soft, place it in the fridge for about 30 minutes.
Remove the prepared base dough and the lattice top from the fridge. Brush the edges of your circle with egg wash, place about 3 tablespoons of cooled cherry filling in the middle of the circle, then place a top layer of pie dough over the top. Press down and crimp the edges with a fork to seal the two pieces together, then decorate the pie with the leftover dough. Cover the pie with plastic wrap, then freeze the pie for at least 1 hour before baking.
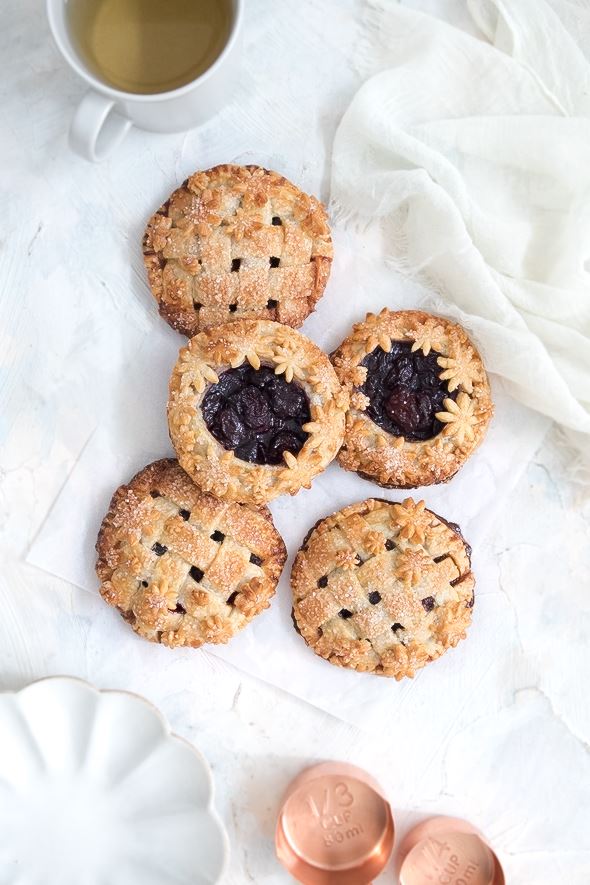
When you’re ready to bake the pie, preheat the oven to 400F. Take the pie out of the freezer, then arrange the hand pies on a baking tray lined with parchment paper, spaced 2 inches apart. Brush each pie with egg wash, and sprinkle with granulated sugar or turbinado sugar.
Bake the pies on the middle rack for about 20 minutes, until the crust is turning light golden brown and looks set. Reduce the oven temperature to 350F, and continue to bake for another 30 to 40 minutes until the crust color is deep golden brown and the filling is bubbly. If the edges are browning too fast during the baking process, cover the edge loosely with aluminum foil or a pie shield. Remove the baked pie from the oven and allow it to cool before serving.

TIPS FOR MAKING THE BEST CHERRY HAND PIES
- Keep the pie dough cool! You need to chill the dough at every step. Chill it before rolling it out, after placing it on your plate, also after you assemble it.
- Freeze the hand pies before baking, so the butter and dough are set and you’ll get a pie with that beautiful flaky crust. This step also makes sure to hold your pie designs. If it’s not cold, the butter will melt instantly in the oven and lose its structure.
- Pre-cook the filling. I recommend you do this step to make sure the filling is thick enough, so you’ll not end up with a wet and soggy pie. The filling should be thick and jammy not like a sauce.
- Cover the pie loosely with a sheet of aluminum foil or use a pie shield if the edges of the crust start to get too brown.
- When the crust is brown and the filling is bubbly, you know your pie is done.
HOW TO SERVE AND STORE THESE CHERRY HAND PIES?
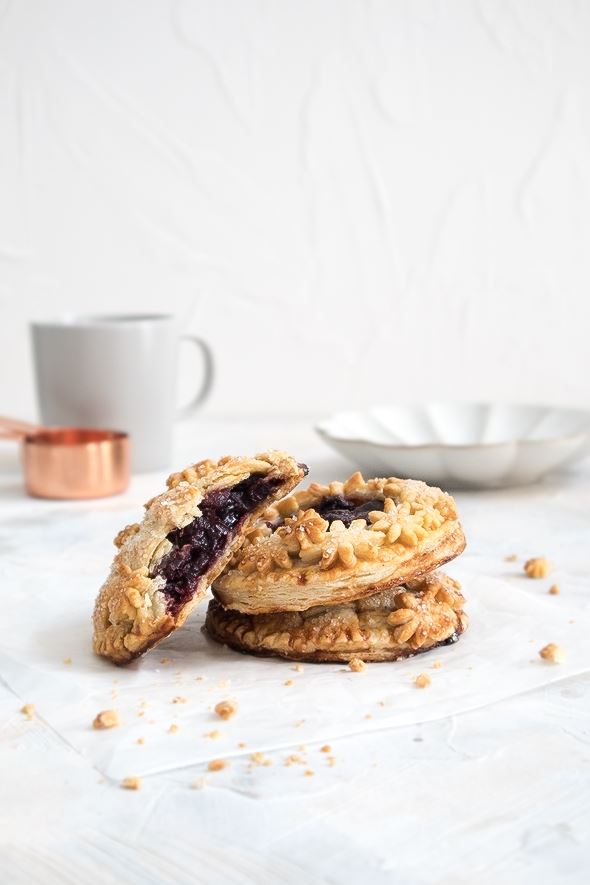
To serve the hand pies – Allow the hand pies to cool slightly before serving, warm hand pies are the best! But you can also serve it at room temperature or serve it with ice cream on top.
To store leftover hand pies – To keep your leftover hand pie fresh, make sure it cools completely, then wrap it with plastic wrap or place the pie in an airtight container, and store it in the fridge for up to 5 days.
To freeze the hand pies after baking – Wrap each pie with layers of plastic wrap then put it in a freezer-safe container. Store it in the freezer for up to 3 months.
Reheat the pie – Preheat the oven to 300°F. Place the hand pies on a baking tray and cover them loosely with aluminum foil to prevent extra browning, then place the pies in the oven for about 15 minutes.
Cherry Hand Pies
These adorably cute and delicious cherry hand pies are made with sweet cherry pie filling and buttery flaky pie crust with a sprinkle of sugar on top! You can enjoy these pies at any time of day, breakfast, afternoon snack, or after-dinner dessert.
Ingredients
Pie Crust
Pie Filling
- 363g (2 + 1/2 cups) halved pitted cherries
- 3 tablespoons granulated sugar
- 1 tablespoon cornstarch
- 2 teaspoon fresh lemon juice
- 1 teaspoon fresh lemon zest, optional
Instructions
Make the Pie Dough:
Here is the recipe and instruction for my homemade all-butter flaky pie crust. I suggest making the dough ahead of time because the dough will need to have some time to chill in the fridge. If you want to use store-bought pie crust, it’s totally ok!
STEP 2 – Make the Pie Filling
Make sure to clean the cherries, then hull and cut the cherries in half. If you're using frozen cherries, no need to clean and thaw it.
In a medium pot, combine the cherries and all the remaining ingredients then bring to a boil over medium heat. Stir constantly for about 2 minutes, then reduce the heat and simmer for about 8 minutes until the cherries are thick and jammy. Remove from heat and allow it to cool completely.
STEP 3 – Assemble and Bake
Divide the pie dough into 2 equal parts. On a lightly floured work surface, roll the first piece of pie dough into a large rectangle, making sure it’s not too thick, about 1/6 inch thick.
Use a 4-inch cookie cutter to cut the dough into circles. Pile the dough scraps on top of one another, then roll it out again and make more circles. You should make at least 6 circles from the first piece of pie dough. These circles are for the base layer of your hand pies. Place the circle on a baking tray lined with parchment paper and place it in the fridge while you make the top layer.
Then, roll the second piece of pie dough into a large rectangle, about 1/6 inch thick to make the top layer, and cut it into stripes to make lattice top or you can simply cut it into circles again. If the dough is too soft, place it in the fridge for about 30 minutes.
Remove the prepared base dough and the lattice top from the fridge. Brush the edges of your circle with egg wash, place about 3 tablespoons of cooled cherry filling in the middle of the circle, then place a top layer of pie dough over the top. Press down and crimp the edges with a fork to seal the two pieces together, then decorate the pie with the leftover dough. Cover the pie with plastic wrap, then freeze the pie for at least 1 hour before baking.
When you’re ready to bake the pie, preheat the oven to 400F. Take the pie out of the freezer, then arrange the hand pies on a baking tray lined with parchment paper, spaced 2 inches apart. Brush each pie with egg wash, and sprinkle with granulated sugar or turbinado sugar.
Bake the pies on the middle rack for about 20 minutes, until the crust is turning light golden brown and looks set. Reduce the oven temperature to 350F, and continue to bake for another 30 to 40 minutes until the crust color is deep golden brown and the filling is bubbly. If the edges are browning too fast during the baking process, cover the edge loosely with aluminum foil or a pie shield. Remove the baked pie from the oven and allow it to cool before serving.
♡♡♡
If you try this recipe, I’d love to hear what you think! Send me a message or write a comment below.
Also, be sure to snap a picture and tag me on your social media posts with #thejobaker
Happy Baking!
Leave a Reply