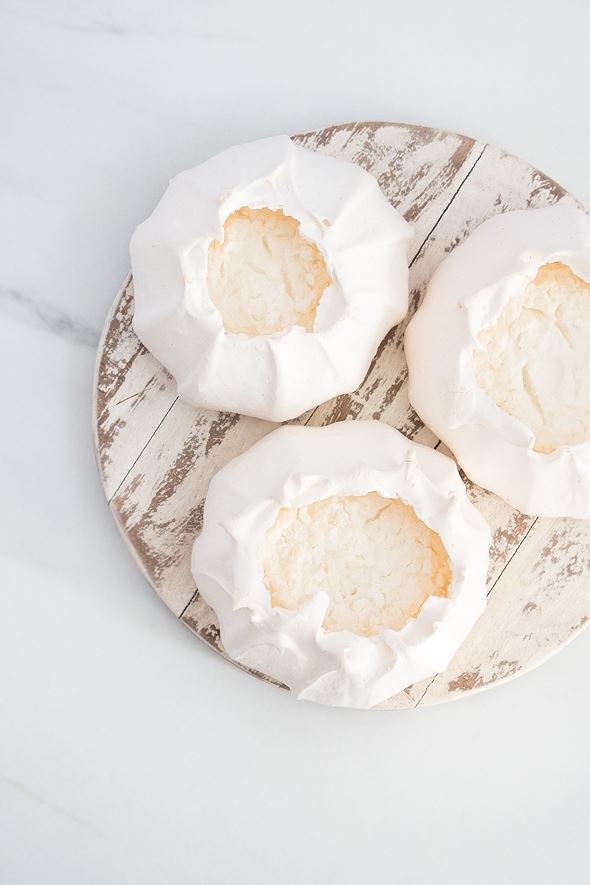
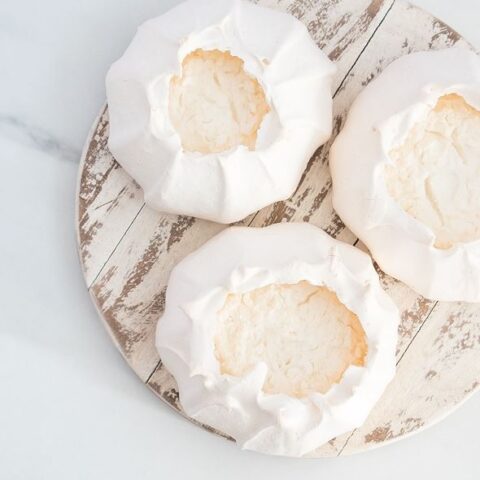
These mini pavlovas are individual versions of a regular pavlova. Delicate and crunchy mini pavlova shells with a soft marshmallow-like center. You can fill it with fresh cream and fruit or chocolate.
If you’re looking for some beautiful desserts to impress your guests, you need to make these mini pavlovas! They’re so simple to make but you need to make the shells a day before because they need to cool down slowly in the oven. Then the next day, you can fill and serve them. I usually fill them with fresh cream, then top with compote and fresh fruits because love sweet and fresh desserts so much. But, you can also fill them with chocolate cream, coconut cream, lemon curd, or greek yogurt tastes great too.
WHY YOU’LL LOVE THESE MINI PAVLOVAS
- Individual portion, no messy pavlova when you serve it.
- Perfect desserts to impress your guests!
- They’re a show-stopper. So pretty and elegant.
- Usually filled with cream and fruits, but you can fill the shells with whatever you want.
- Perfect for any time of year.
- You can add 1 teaspoon of powdered flavors like cocoa powder or matcha powder to add flavor to the shells.
INGREDIENTS NEEDED & NOTES
Egg Whites – You can’t make a pavlova without egg whites! Fresh eggs are best for making pavlovas and the egg whites need to come up to room temperature so that they whip better. Remove eggs from the refrigerator and separate them, then allow egg whites to reach room temperature.
Fine sugar – You’ll need sugar for the egg whites mixture. Besides adding sweetness, sugar helps stabilize the pavlova’s structure by holding them together. Without sugar, the egg whites can break more easily. Make sure that you use fine caster sugar so the sugar can dissolve into the whipped egg whites easily.
Vinegar – Acid such as vinegar helps prevent the egg whites from collapsing and make a more stable foam when the meringue is mixed. If you’re out of vinegar, you can use fresh lemon juice.
Salt – Pavlova is made with a lot of sugar, so salt is very important to balance the sweetness.
Cornstarch – Adding cornstarch helps the meringue to stay soft in the center. It also makes the center fluffier and marshmallowy
Cold water – You can skip adding cold water, but if you want thinner shells and a softer center, you can add 1 tablespoon of cold water to your egg white mixture
Powdered flavor – This is totally optional, but you can add 1 teaspoon of powdered flavor like cocoa powder, matcha powder, or finely ground coffee to add flavor to the shells. If you use this, don’t skip the cold water.
Cream – Pavlova is usually filled with cream. I suggest filling it with a stiff peak cream, don’t fill it with soft cream to avoid wet and cracked shells.
Topping – I usually fill my pavlovas with cream, then top with compote, jam, and fresh fruits, but feel free to top it with whatever you want!
BAKING TOOLS & EQUIPMENT YOU’LL NEED
(Check my favorite baking tools and equipment here!)
- Electric mixer (handheld or stand mixer)
- Parchment paper
- Large baking sheet
- Spatula
- Rubber spatula
STEP-BY-STEP INSTRUCTIONS TO MAKE THESE MINI PAVLOVAS
(Be sure to check the recipe card below for the full ingredients list & instructions)
STEP 1 – Make the Pavlova Shells
Preheat your oven to 250F. Trace six 3.5-inch circles on a piece of parchment, then turn the parchment paper over so that the circle lines are underneath. Set it on a large baking sheet.
Using a stand mixer or a hand mixer fitted with a whisk attachment, whip the egg whites on medium speed until foamy, then add the vinegar and continue whipping until medium-stiff peaks about 3 minutes.
Drizzle in the sugar slowly while whipping the egg whites, about 2 tablespoons at a time. Once all the sugar is added, turn up the speed to medium-high and whip until stiff peaks.
Stop the mixer and scrape down the sides and bottom of the bowl. With the mixer on medium speed, gradually add in salt, vanilla extract, cornstarch, and ice-cold water.
Then, you can add extra flavor if you like and mix for another 2 minutes and make sure it distributes evenly. The mixture should still be very stiff, glossy, smooth, and have no sugar grains. The mixture won’t budge when you flip the bowl upside down.
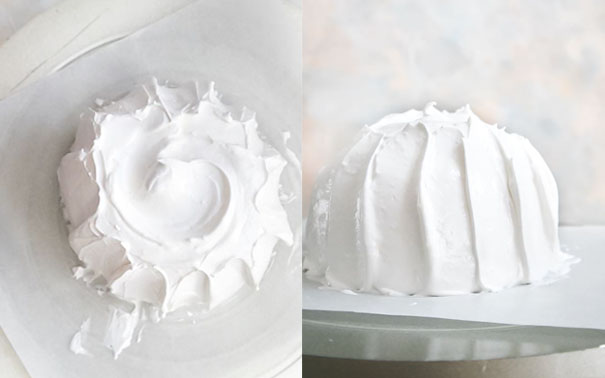
Scoop and dump the mixture onto your prepared baking sheet. Use the circle you drew as your guide, and spread out the meringue with a spatula to create a large meringue nest. Smooth the sides and clean up the bottom. Now you can shape the meringue by using a spatula to create the shell design and indent the top to help the center crack and sink in evenly.
Carefully place the pavlovas in the oven. Bake at 250F for 20 minutes or until the meringue starts to turn a very pale tan color. Reduce the heat to 220F continue to bake for another 1 hour. Turn the oven off and leave the pavlovas in there to cool slowly for at least 3 hours, preferably overnight.
STEP 2 – Assemble and Serve
When you’re ready to serve the pavlovas, carefully peel the pavlova shells from the parchment paper and place them on your serving plates. You need to do this before you fill them.
If the center of your pavlova shells don’t crack and sink in, you can use a small knife and cut the center open.
Use a pastry bag to carefully fill the pavlova with stiff peak heavy cream, compote or jam, and top with fresh fruits. Enjoy!
TIPS FOR MAKING THE BEST PAVLOVA
- Always make sure the bowl and whisk you are using to make your pavlovas are clean and dry.
- Egg whites need to come up to room temperature so that they whip better, and there must be no egg yolk in the mixture.
- Make sure to use superfine sugar, because sugar needs to be incorporated well to avoid sugar syrup weeping out of the pavlova when baking. Rub the mixture gently between your thumb and finger. It should have a smooth and glossy look.
- The mixture should be very thick (stiff peak), glossy, and soft. If they’re not stiff enough the pavlova will not hold its shape.
- After the baking process, turn the oven off and leave it in the oven for at least 3 hours (preferably overnight) to cool completely.
- Carefully peel the pavlova shells from the parchment and place them on the serving plate. You need to do this before you fill it.
- Bake the pavlovas on low heat to avoid it browning too fast and cracking.
HOW TO STORE THESE PAVLOVAS
I recommend storing these mini pavlovas without filling them. Only fill and decorate your pavlova just before serving. It will hold for about 40 minutes before softening and losing some of its crisp texture.
Pavlova shells (before filling it with cream and compote) can be stored for up to 24 hours. I’d recommend storing it inside the oven (a cool, turned-off oven with a light on). In my experience, storing the pavlova shell in an airtight container makes it weep and go soft. Do not store it in the fridge!
HERE ARE SOME FLAVOR IDEAS FOR YOUR MINI PAVLOVAS
– Cranberry Orange Mini Pavlovas
Made these mini pavlovas for Christmas dinner with my friends last year. Crunchy mini meringue shells with a soft marshmallow-like center. I filled them with fresh whipped cream and my homemade cranberry orange compote, then topped with fresh fruits. They disappeared fast! Everyone loved it.
To make these cranberry orange mini pavlova, you’ll need:
- 1 recipe basic mini pavlova
- Whipped cream, for the filling
- Cranberry orange compote, for topping
- Fresh orange slices, for topping
To make the Whipped Cream:
Place your mixing bowl and whisk attachment in the freezer for 15 minutes to chill. Then, add 1 cup of cold heavy cream and whisk on medium-low speed for 1 minute. Once the mixture starts to increase in volume, increase the speed to medium-high and continue mixing until stiff peaks form. Add 1/3 cup powdered sugar and 1 teaspoon vanilla extract, then whisk for another minute until well combined.

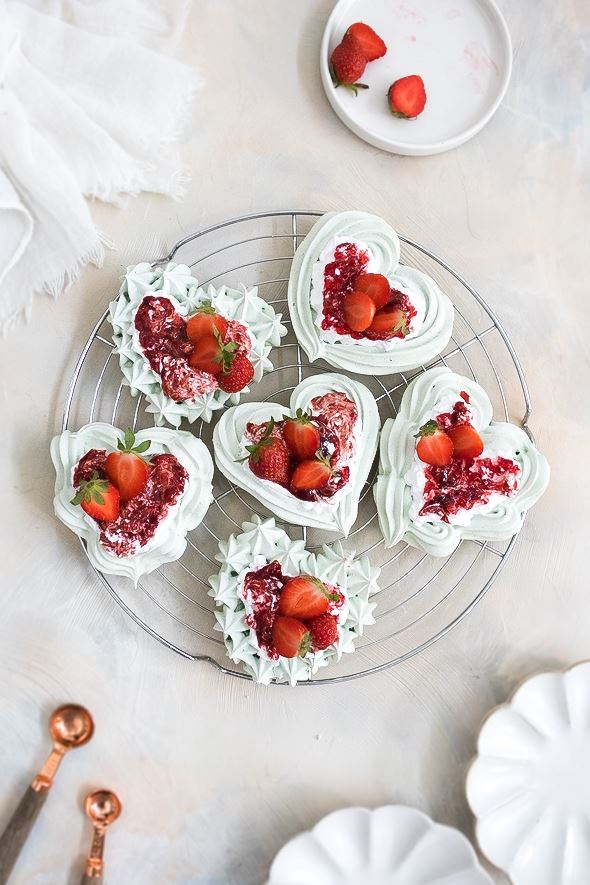
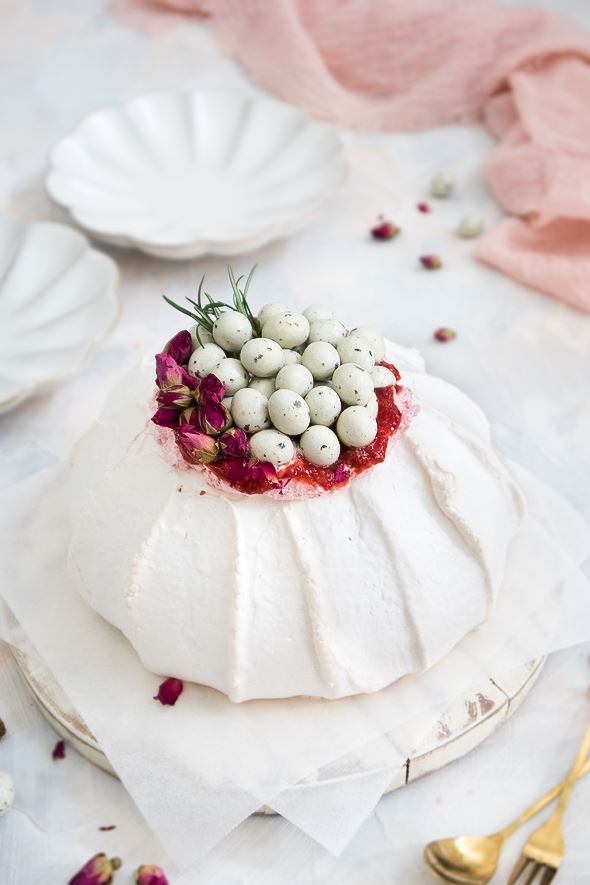
– Strawberry Matcha Mini Pavlova
Heart-shaped mini meringue shells with matcha flavor filled with fresh cream and swirled with strawberry jam, then topped with fresh strawberries. Aren’t they so cute? These are perfect for Valentine’s Day!
To make these strawberry matcha mini pavlovas, you’ll need:
- 1 recipe basic mini pavlova
- 2 tablespoons matcha powder
- 1 teaspoon ice-cold water
- Green gel food coloring
- Whipped cream, for the filling
- Strawberry jam, for the filling
- Fresh strawberries, for topping
To make the Whipped Cream:
Place your mixing bowl and whisk attachment in the freezer for 15 minutes to chill. Then, add 1 cup of cold heavy cream and whisk on medium-low speed for 1 minute. Once the mixture starts to increase in volume, increase the speed to medium-high and continue mixing until stiff peaks form. Add 1/3 cup powdered sugar and 1 teaspoon vanilla extract, then whisk for another minute until well combined.
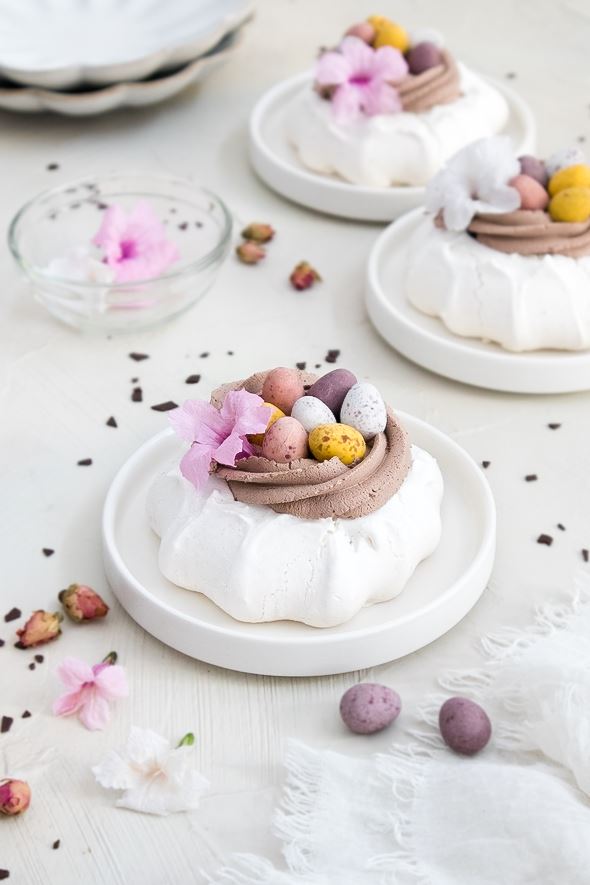
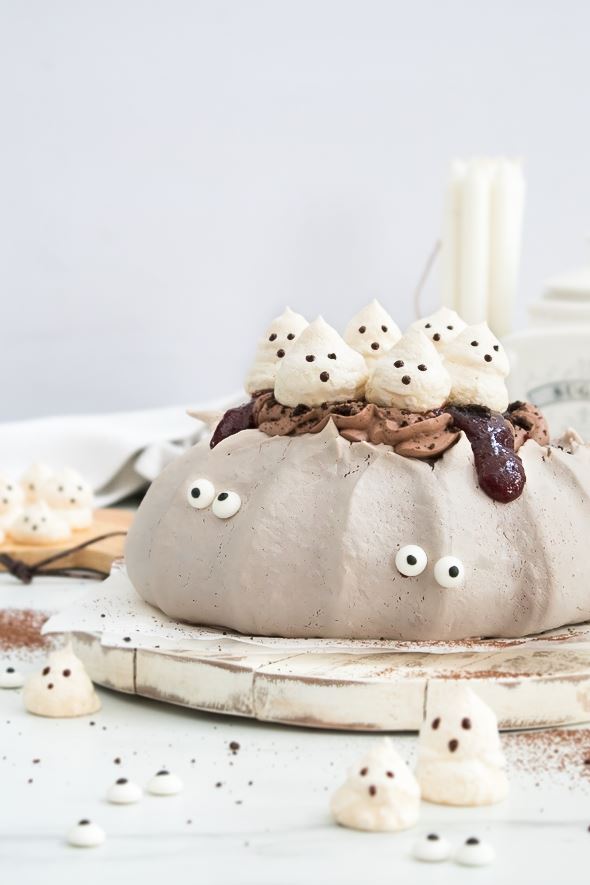
– Bird Nest Mini Pavlova
These mini pavlovas are filled with semi-sweet chocolate ganache, topped with chocolate whipped cream, and decorated with chocolate mini eggs. These are super easy to make and so adorable! Perfect for Easter!
To make these strawberry matcha mini pavlovas, you’ll need:
- 1 recipe basic mini pavlova
- 1,5 cups heavy cream
- 4oz semi-sweet chocolate, chopped
- 1/3 cup powdered sugar, sifted
- 3 tablespoons unsweetened cocoa powder, sifted
- 1 teaspoon vanilla extract
- Chocolate Mini Eggs
To make the Chocolate Whipped Cream:
Place your mixing bowl and whisk attachment in the freezer for 15 minutes to chill. Then, add 1 cup of cold heavy cream and whisk on medium-low speed for 1 minute. Once the mixture starts to increase in volume, increase the speed to medium-high and continue mixing until stiff peaks form. Add 1/3 cup powdered sugar, 3 tablespoons cocoa powder, and 1 teaspoon vanilla extract, and whisk for another minute until well combined.
To make the Chocolate Ganache:
Place 4oz of chopped chocolate in a heatproof bowl, and set aside. Bring 1/2 cup of heavy cream to a simmer in a small saucepan until small bubbles appear around the edges. Do not boil the cream. Pour hot cream over the chocolate, cover with aluminum foil, and allow to stand for 1 minute, then whisk until smooth and shiny. Wait until the ganache is slightly cool before you fill your pavlova.
*If the chocolate has not melted completely, set the bowl over a saucepan filled with simmering water. Keep stirring until the chocolate and cream are fully combined, smooth, and silky.
Mini Pavlovas
These beauties are individual versions of a regular pavlova. Delicate and crunchy mini meringue shells with a soft marshmallow-like center. You can fill it with fresh cream and fruit or chocolate.
Ingredients
Basic Pavlova Shells
- 90g (about 3) large egg whites
- 150g (3/4 cup) caster sugar
- 1/2 teaspoon vinegar
- a pinch of salt
- 1 teaspoon vanilla extract
- 1/2 teaspoons cornstarch
- 2 teaspoons ice cold water
Extra Flavor (optional)
- 2 tablespoons matcha powder + 1 teaspoon ice cold water
- 1 tablespoons cocoa powder + 1 teaspoon ice cold water
Filling and topping
- Stiff peaks or medium peaks whipped cream
- Compote, jam, or ganache
- Fresh fruits, or chocolates
Instructions
STEP 1 - Make the Pavlova Shells:
Preheat your oven to 250F. Trace six 3.5-inch circles on a piece of parchment, then turn the parchment paper over so that the circle lines are underneath. Set it on a large baking sheet.
Using a stand mixer or a hand mixer fitted with a whisk attachment, whip the egg whites on medium speed until foamy, then add the vinegar and continue whipping until medium-stiff peaks about 3 minutes.
Drizzle in the sugar slowly while whipping the egg whites, about 2 tablespoons at a time. Once all the sugar is added, turn up the speed to medium-high and whip until stiff peaks.
Stop the mixer and scrape down the sides and bottom of the bowl. With the mixer on medium speed, gradually add in salt, vanilla extract, cornstarch, and ice-cold water.
Then, you can add extra flavor if you like and mix for another 2 minutes and make sure it distributes evenly. The mixture should still be very stiff, glossy, smooth, and have no sugar grains. The mixture won't budge when you flip the bowl upside down.
Scoop and dump the mixture onto your prepared baking sheet. Use the circles you drew as your guide, and spread out the meringue with a spatula to create a meringue nest or any design you like Smooth the sides and clean up the bottom. Now you can shape the meringue by using a spatula to create the shell design and indent the top to help the center crack and sink in evenly.
Carefully place the pavlovas in the oven. Bake at 250F for 20 minutes or until the meringue starts to turn a very pale tan color. Reduce the heat to 220F continue to bake for another 1 hour. Turn the oven off and leave the pavlovas in there to cool slowly for at least 3 hours, preferably overnight.
STEP 2 - Assemble and Serve:
When you’re ready to serve the pavlovas, carefully peel the pavlova shells from the parchment paper and place them on your serving plates. You need to do this before you fill them.
If the center of your pavlova shells don’t crack and sink in, you can use a small knife and cut the center open.
Use a pastry bag to carefully fill the pavlova with stiff peak heavy cream, compote or jam, and top with fresh fruits. Enjoy!
♡♡♡
If you try this recipe, I’d love to hear what you think! Send me a message or write a comment below.
Also, be sure to snap a picture and tag me on your social media posts with #thejobaker
Happy Baking!
Leave a Reply